Simulation Setup
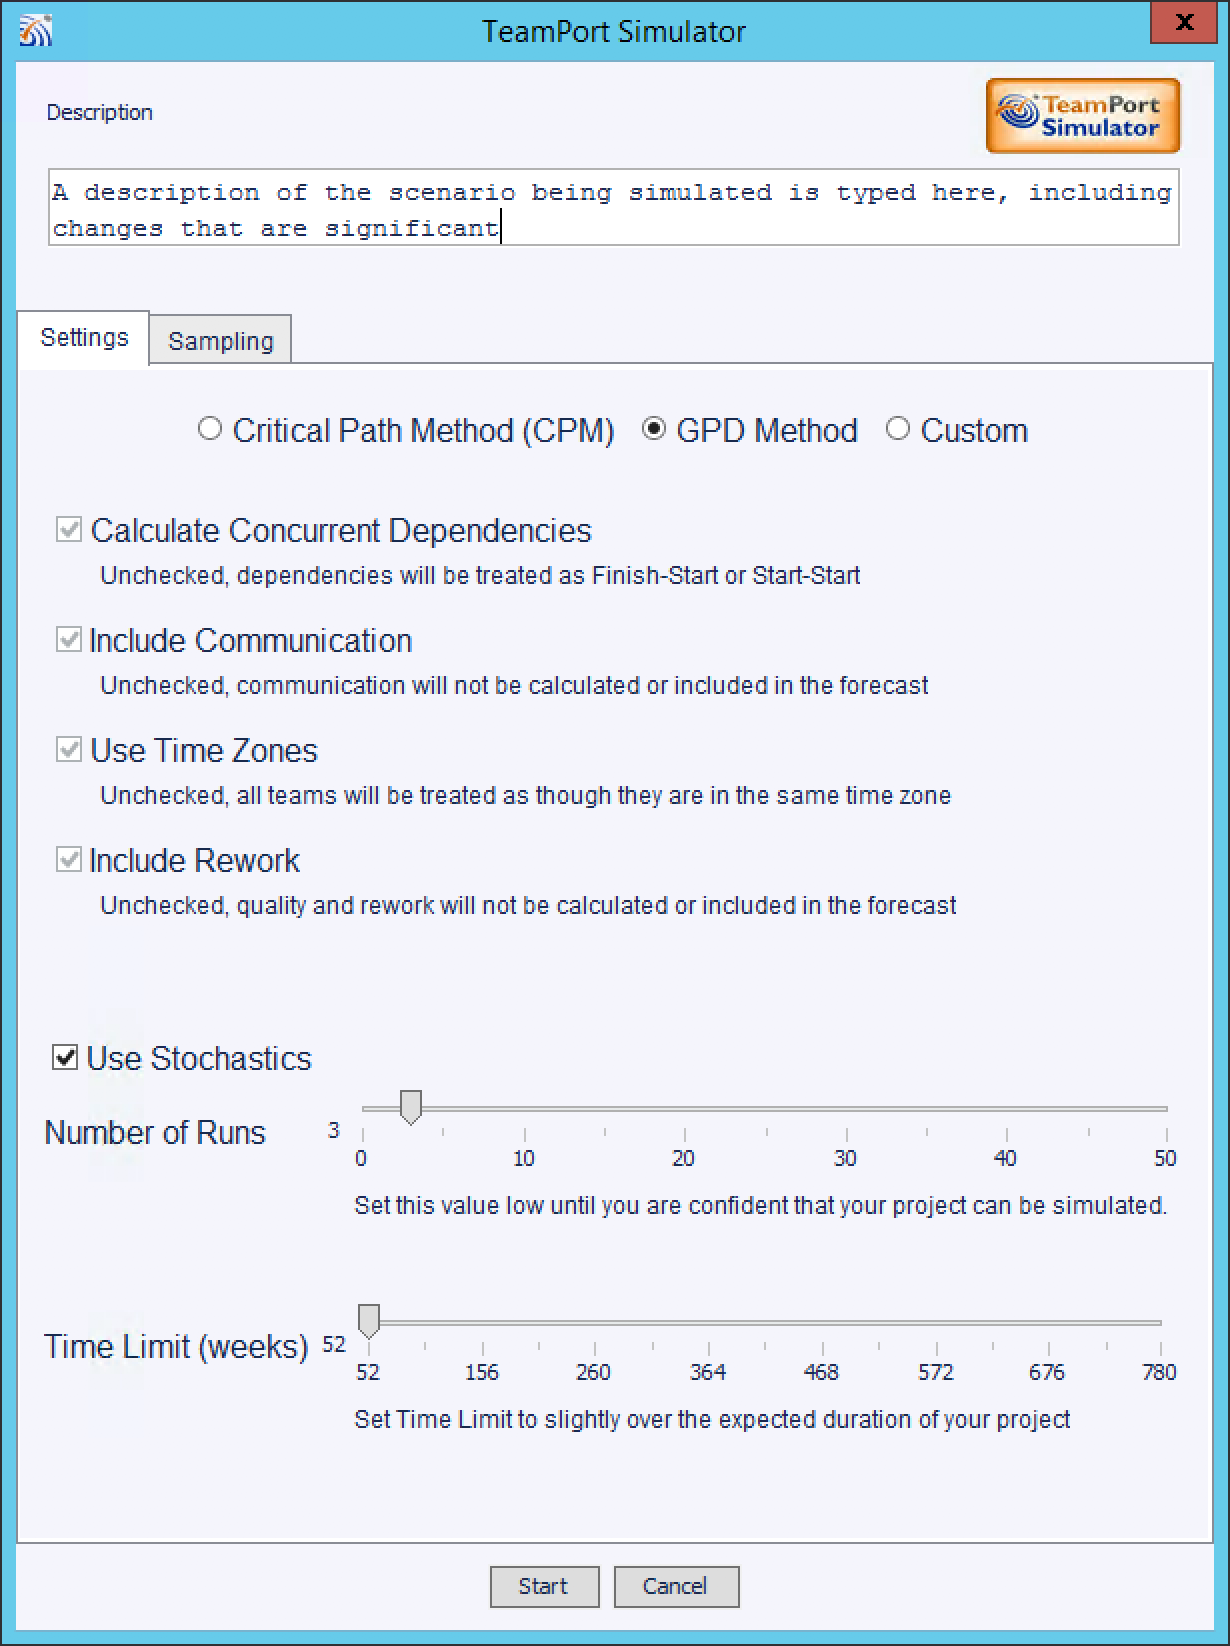
Simulator Settings Sheet
CPM Method: a method with similar assumptions as those required by the Critical Path Method, and often how project schedulers such as MS Project calculate a project schedule. However, TeamPort will consider resource contention.
GPD Method: includes the four options listed below to provide you with a more natural and accurate project forecast.
Custom Method: allows you to select how you want your project to be simulated:
By selecting concurrent dependencies the simulator will calculate work and communication effort following the characteristics that you configured in each dependency. Excluding this option will treat all dependencies as finish-start, start-start, and finish-finish relationships.
By including communication the simulator will calculate the time and cost associated with communication and include it in the forecast.
By using time zones the simulator will calculate communication between teams based on their location settings. Not selecting this option causes the simulator to assume a single time zone for all teams.
By including rework the simulator will add rework to the project.
Select Use Stochastics to have the simulator vary the actual amount of time spent performing work or communication. If not selected set the Number of Runs to 1 on the Settings Sheet.
Number of Runs: is used to set the accuracy of the forecast. For simulations after extensive model changes keep this number lowÑ1 to 3 runs. Typical settings are 10-25 to create and accurate forecast.
Time Limit: is used to limit the simulator to the duration you set. Typically this setting is twice the anticipated duration of the project.
Sampling Sheet
The options given on the Sampling Sheet are turned on by default as depicted. Early in a project design process omitting trends may be worthwhile to speed simulation time. As a project progresses include trends to provide data for deeper project analysis.
Trends Settings determine whether trends are created (accessed by selecting a Timeline button in Forecast). Creating trends increases simulation time but is encouraged as a project progresses. The detail delivered in trends helps to further refine a project.
Sample Interval (hrs) determines how often data is collected. Typical settings are 24 hours for a smaller project, up to 1 week for complex projects and those over a year in duration. More samples (shorter interval) will increase simulation time.
Max Steps # controls how many times the simulator makes a pass through the data. This setting stops the simulator if there is a loop in the that cannot be completed. Except for very large and complex projects set this control to 2000.
Discussion
On the Settings pane:
-
Select GPD Method to include the four options below it, select Critical Path Method (CPM) to select none of the options, or select Custom to individually select options.
-
By selecting concurrent dependencies the simulator will calculate work and communication effort following the characteristics that is configured in each dependency. Excluding this option will treat all dependencies as finish-start, start-start, and finish-finish relationships. Typically this option is de-selected when the forecast is being compared with other systems that do not support complex dependencies. In normal use it should remain selected to accurately reflect the impact of complex dependencies on the project forecast.
-
By including communication the simulator will calculate the time and cost associated with communication and include it in the forecast. De-select this option to exclude communication from the forecast. Note that project cost, duration, and effort may be reduced when communication requirements are omitted, which can make comparing a project in TeamPort to one represented in a scheduler a better comparison.
-
By using time zones the simulator will calculate communication between teams based on their location settings. Not selecting this option causes the simulator to assume a single time zone for all teams. Time zones can expose critical issues in a project design, such as when two teams have no overlapping work hours but are expected to work together. Many project schedulers do not take time zones into account when creating a schedule; deselect this option if comparing to a project in another system.
-
By includung rework the simulator will add a percentage of rework to activities. The amount of rework is based on several factors and some randomization between simulation runs. Adding rework models the reality that activities usually take longer than anticipated.
-
Select Use Stochastics to create a Monte Carlo simulation
-
Set the Number of Runs to at least ten runs, more if time allows
-
Set the Time Limit (weeks) to 13-26 weeks beyond the anticipated duration of
the project
On the Sampling pane:
-
Create trends unless specifically not needed. Trends offer insight to simulated
behavior of the model that can drive better decision making when making changes to the
model to improve cost, duration, or effort. Creating trends will take more time.
-
The Sample Interval determines the size of each simulated step. A model
with more steps will be more accurate, however that accuracy may not be significant on a
large project or during early design when many other factors are known to be not properly
reflected in the model. A fine grained simulation has a step of 24 hours, coarser
simulations on large projects can go to 1-2 weeks. The wider the sample interval the
faster the simulation will run.
-
The Max Steps #(x1000) creates a stop point for the simulator. This
limit setting is a fail-safe should the project have a loop that would cause simulation to
never complete. Typically a setting of 2000 is sufficient for large projects.
If a simulation run exceeds the set number of steps the simulation will be stopped
and an error message will indicate that the simulation exceeded the maximum number of
steps.